Time for a «reality» check with Revit

As an architect I want my projects to be conscious to its surroundings. Sometimes I want the project to be a contrast to its surroundings, and sometimes I want the project to blend in with its surroundings. It all depends on where, what and why.

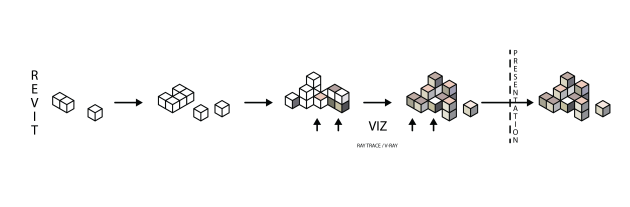
That is why I usually start creating the geometry that will impact the design of the project from the very start of a project. And instead of creating simplified volumes/masses of buildings around the project, I now want to use the geometry I have created with Reality Capture with either photogrammetry or scanning.

The reason is obvious. I get much more richness and accuracy than I get from a simple volume model. The only question now is how I can use the Reality Capture model in my design?

billingstad

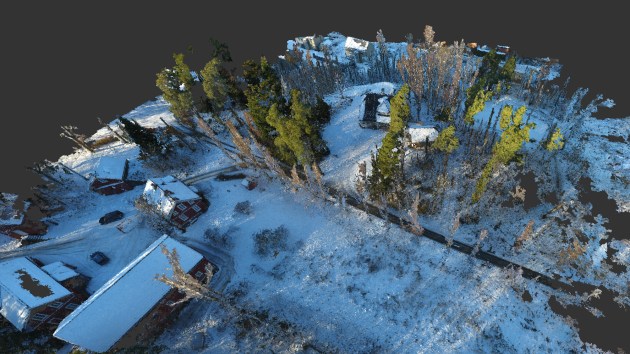
A typical reality capture model that I want to use in Revit

Since there is no good way of importing a large mesh with textures into Revit, pointcloud is the only gateway for Revit users to interact with the «Reality» while designing. And the limitation of only being able to import pointcloud is not necessary a bad thing, but it then requires that Revit supports the features that make pointcloud useful in its design.

recap

Pointcloud in Recap

First of all I have to say that I am impressed on how Revit deals with huge pointcloud files. The performance working with pointcloud is surprisingly fast , and the visibility of the pointclouds when using clipping plane or section box is very solid. In addition you have the possibilities to override the colors and turn on and off «scan regions» and «scan locations». This can be very useful in many occasions.

But that is pretty much what you can do with «out of the box» Revit and pointcloud. Yes you can buy add-ins that vastly improves the functionality, but I do think Revit should step up the game and start giving its users more tools.

But ok. The tools are a bit limited but in most cases it is sufficient. Let us now focus on the benefits you have in front of you:

  • you can design your project in «reality». You see immediate how the project responds to its surroundings
  • In my experience, the municipalitiy gives positive feedback on a project when they see that the project has «true» surroundings
  • you can create an accurate and updated terrain based on a «fresh» pointcloud
  • it is easy to accurate model existing buildings, plants, trees etc.
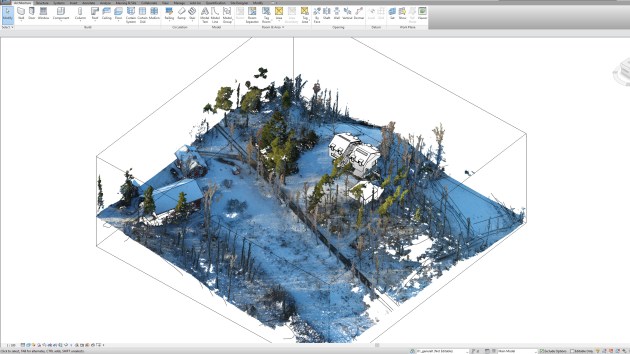
revit

Pointcloud in Revit

Ideally you should not need to model the things that is already in the pointcloud since it is already there. But in my experience it is hard to avoid since pointclouds:

  • do not cast shadows
  • do not render in raytrace
  • do have a hard time get into VR
  • have to use third parts applications to categorize the points (wall, floor, roof, site elements etc)
  • it is not often I am presenting the project to a client within the interface of Revit. Lately I have started using Live with great success. Guess what, pointclouds will not be exported to Live. On the other hand you can import mesh into Live but good luck trying getting it correctly placed
  • change their looks depending on the printer quality settings (see photos below that illustrates this). You will have to comprise between quality of the pointcloud and Revit elements.

I understand that Revit is not supposed to solve everything and I do think that this is a good strategy. But I do believe that Revit should do some serious work done to get the pointcloud even more useful for specially presenting the project.

After all, we want the design to be a reality.

Want to work together?

As the render quality within Revit is getting better and better, in combination with less and less time for preparing presentation and deliveries, I tend to do more and more of my work within Revit.

When I need better renderings than I manage to do in Revit myself, I export the Revit project to someone that can do the job in 3D Studio with V-Ray for me. And it works just fine and I am very happy with the results.  But usually I am developing the project almost to the last hour before the deadline, and in these situations it is difficult to outsource the renderings since they need the model in advance.

revit_viz

Exporting the Revitproject for rendering in 3D Studio

This is something I want to change. Since the render quality within Revit with Raytrace or V-Ray for Revit is getting better, I want people doing the renderings for me to do it within my Revit project. In this way, I can have a value of the materials that are adjusted, the light settings that are created, the surrounding that is created, throughout the entire process. So when I export my project to Autodesk Live or other platforms, I get these settings exported straight away without much work since they already are applied.

revit

Do the work within Revit

So if you have great Revit skills, and superior skills with Raytrace or V-ray for Revit with a great aesthetic touch and totally trustful, I want to work with you on my projects. I am willing to invite you into my Revit project with Collaboration for Revit -The Holy Grail

key

If you feel that you are the ONE, please do not hesitate to give me hands up by sending me an email. It would be great to work together with you.


Architecture Biennale 2016

I just came back from a fabulous trip to Venice. It was my first time to the picturesque but touristic city, but my main attraction was the Venice Architecture Biennale. The Architectural Biennale was a great experience and it surely refueled my architectural interest.

Regarding digital design and architecture, I became immensely impressed by both the exhibition Beyond Bending by Block Research Group and  DeJong & Block, and the exhibition made by Forensic Architecture.

I was not aware of the work of Forensic Architecture and the way they managed to present their work was really inspiring.


VR and graphics cards

We have started flirting with VR at our office and when I tested if our computers were VR-ready with «SteamVR Performance Test», I was pretty surprised.

We are using Lenovo ThinkStations P900 Workstations. They are considered as high end computers with «extreme performance». These P900 have either Nivida Quadro K4200  or Nivida GeForce GTX 970 installed, but the rest of the specs are the same. You can see the results from the performance test below:

Yes, I knew that the GTX970 was superior before I tested, but I must admit that I was surprised that the K4200 did not score better.

Btw, if you are going to buy a new workstation in the near future, you should wait for the GTX 1080.

Memento Mori -reborne to Remake

It has been a joyful ride to follow the development of Memento the last couple of years. They have made photogrammetry intuitive, and changed the way my colleges and me have been working as architects.

I am happy to see products that has been in Beta, released as commercial product when they are matured and ready. For Memento, I understand that this will happen i May. Last Friday they released the last Beta version of Memento and the announced that the official product name will be Autodesk Remake.

They released couple of new features in the last Beta and you can read about them in detail here. One of the features that has been wanted for a long time is the «Offline reconstruction». This feature will enable you to process your images on your local computer instead of sending it to the Autodesk servers. This process is computationally very intensive and from the recommended specs that you find here, you may want to upgrade your computer…

I also feel that an epoch has ended. An epoch of an unlimited playground of testing and playing that was free and noncommittal. That is something that is a rare experience in our digital world and has made Memento, in addition to its intuitive tools, unique.

I am looking forward seeing the final commercial release and I will follow Memento closely in the future. I hope the software team manage to keep Autodesk Remake as intuitive and uncompromising as possible, and that they not are trying to solve too many problems in one software.

Phantom 4 -love at first sight

Three weeks ago, I had never flown a real drone before. However, since my appetite for reality capture has been growing lately, I felt it was time to invest in a drone that could be used for photogrammetry. Therefore, after comparing/evaluating/comparing again different types of drones, I finally decided to buy the Phantom 4.

I am always afraid of being disappointed when I finally receive something that I have been waiting for a long time, but in this case, it was no need to worry. DJI made even the unboxing an Apple-like feeling, and when the drone was revealed I was stunned by the sexy and elegant design. I was so starstruck that it was the first time in my life that I read the manual, saw all the instruction videos on YouTube, before I even turned it on. The Phantom 4 became «my precious».

When I finally had the guts to try it outdoor, it was a joyful experience. The software was intuitive, the controller felt solid and precise, and the drone was responsive. I have tested out most of the features like the «activetrack», «tapfly», «obstacle sensing system», «return to home» and many more. I do start to trust these features, but it still feels crazy to fly the drone with full speed towards a wall and trust the «obstacle sensing system» to automatically stop your drone before it crashes.

I have also tested the Pix4D app with the Phantom 4 two times already. It is a great app and I will review it in a later blogpost. I generated a Sketchfab model from my latest flight. You can see the result below:

At the moment I am not using «my precious» for commercial use. I want to be a better pilot first, and I need to apply to the Civil Aviation Authority to get the right approval. This is important to me, since I see the potential danger a drone can cause.


RTC Budapest 2015 -this time as a speaker

RTC Europe (Revit Technology Conference) is an annual educational and networking event for BIM users worldwide. This is the place to be for top notch sessions, sharing of knowledge and catching up on the latest trends within digital tools. I have been to every RTC event since it started here in Europa and this time Budapest was the luck city to host this event.

This year, I was not only a delegate at the RTC Europe in Budapest, but I was also a speaker. Together with  Margarida Barbosa from Beck group we delivered a session on «Using Photogrammetric Surveys at Architectural Offices» where we explained the potential of using photogrammetry in the daily workflow.

By combining the eminent knowledge Margarida has on this subject, with my experience from work, we delivered a 75 min session for «all levels». It was a joyful experience and we were super proud to be rated no. 5 top speaker at the conference. To see the entire top ten list, check out the blog posted by Jose Fandos.

Do not hesitate to contact us if you have any questions related to this subject. We are happy to share our discoveries.

See also the review by Jack White, BIMcrunch Editorial – RTC Europe 2015 Review


See you in Portugal next year!


I have a video but all I want is a beautiful 3D model

Instead of taking multiple photos of an object to create a 3D model, you should consider capturing video of the object instead. As we all know, a video consists of multiple frames that are stacked together and the frame rate is somewhere between 24 and 30. So basically you can just extract the frames from the video and use these frames to create a 3D model by using photogrammetry.

This is one way you can do it:

  • open your video in Photoshop
  • press the «Render Video» button in your «timeline» tab
  • select the «Photoshop Image Sequence» and be sure you have maximum quality for the JPG´s
  • if you are going to use Memento, you can not exceed 250 photos. I usually divide 250 with the duration of the video in seconds. In this way, I will not extract more than 250 frames
  • hit the «Render» button and wait

You have now approximately 250 photos waiting for you to import into Memento and then it is just to wait for the processing to be completed.

Voilà!

PS! I have all my personal videos stored in «Google Photos». Have Google ever considered starting making 3D model effects from these videos by using photogrammetry, or are they just waiting for «Google Tango» to make the first dance…?

Combining Google Maps, photogrammetry and pointcloud into Revit

I guess I have a hang up on photogrammetry lately. But I enjoy the way you can move data quickly in an effortless operation.

Google Maps is getting better and better, and to be honest I am really amazed how you can view an entire city in great detail. We use Google Maps in our office to investigate exciting sites and surroundings, and I have thought that it would have been valuable to import this information into Revit.

And guess what, by using photogrammetry I made it happen:)

In short:

  • open google maps in full screen and find your building site
  • rotate the view around your site meanwhile you press «print screen» as often as you wish
  • with dropbox installed, the «print screens» should be perfectly downloaded automatically
  • you should crop your photos to get rid of unwanted text/labels. You can do this by making an «action» in Photoshop and then choose «File» – «Scripts» – «Image Processor» to crop every photos in a folder
  • then you make a mesh in Memento with your cropped photos and export it in RCP
  • import it into Revit and enjoy

PS! For fun, I also tried to do photogrammetry with Google Streetview. It was not successful but I will try again later. I do have some ideas:)

Zoo and Amusement Park excursion

The last five years, my family have been visiting «Kristiansand Zoo and Amusement Park» in the summer holiday. It is a great park that has a lot to offer to children in different ages, and we usually stay there for two full days.
Even I get the great feeling of being young again. I relive my own experience when I visited the park as a kid, and it is great to be childish together with my son on a pirate ship and shout «yo ho».

There is of course a stress factor involved. You have two children to look after, ice cream in one hand, camera in the other, a lot of people running and walking, and you are trying to meet the expectation of the children.
But even then, you want to capture this moment, the feeling of joy and anticipation. And for decades we have captured this moment with photos and videos, and we post it on different social mediums. And before this existed, we placed the photos in a family album. But what if we could push it to a new level. Could I manage to tell a story of my experience in a different way?

Well, the result was somewhat successful regarding the time and limitation I had taking the photos. No, I did not bring a drone to capture photos from the skies:) Nor did I have the privilege to stroll around in my desired speed. But hey! I got some decent results from some of the places we visit during our stay in the park. I only wished I could have captured my great kids as well but have you ever tried to ask your kids to stand still in five minutes in a amusement park… 🙂

Please visit my Sketchfab page to see the results: https://sketchfab.com/models/4aa1037f567345cd92ae126a7729ac97

Or take a look at this video: